

Automate Code Deployment And Infrastructure Provisioning On Azure Using Terraform And Azure DevOps


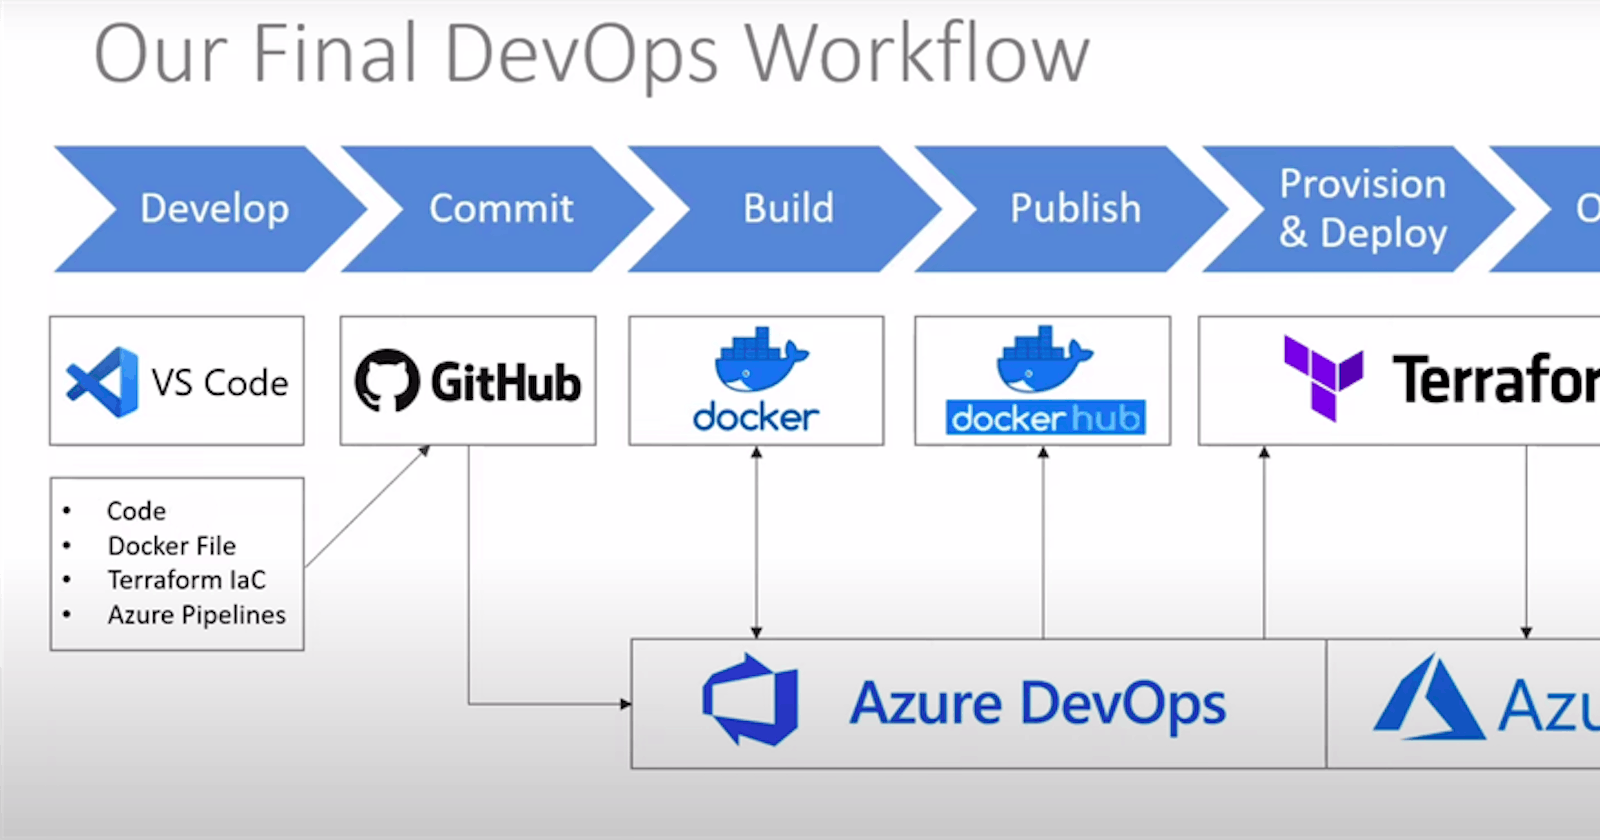
I have started working with Azure recently and I have to create many resources on Azure and modify them as per my need. In order to do so, I need to visit the Azure portal and believe it takes time and effort to create them manually. But what if I said there is a way to automate everything? You just need to push the changes to Github and it will automatically perform everything.
Before doing anything, first, you need to have Azure CLI installed on your machine and you must authenticate yourself in order to create resources on Azure automatically.
Install the Azure CLI
sudo apt-get update
sudo apt-get install azure-cli
For other OS you can learn here. So this is what we are going to do. Let's divide it into simple steps.
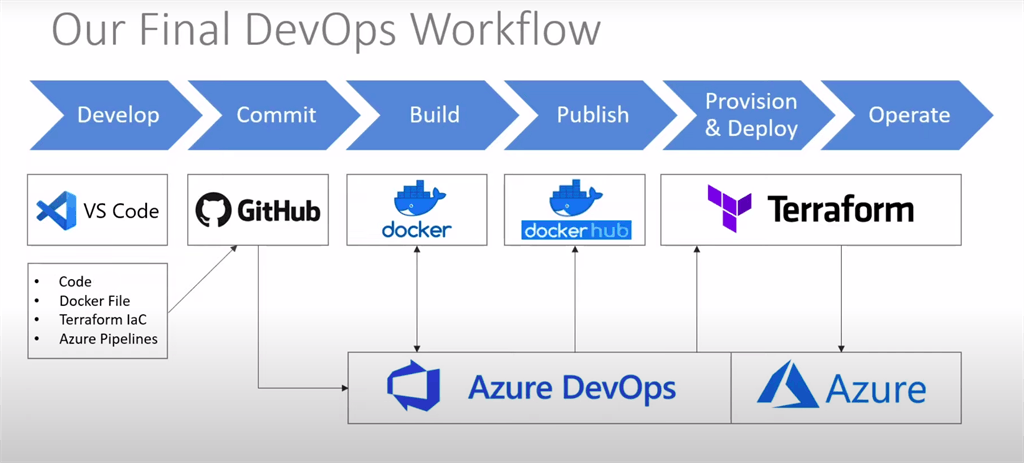
Step 1: We are going to create a simple 'Hello World' in Node.js and push it to GitHub and write DockerFile
Step 2: Setup a pipeline in Azure DevOps
Step 3: Automatically create a docker image and push it to the docker hub
Step 4: Set up Terraform for automatically creating resources in Azure and deploying docker image.
So let us start with our first step.
Step 1 - Create a simple 'Hello World' in Node.js and push it to GitHub
What is Node.js?
Node.js is an open-source, cross-platform, JavaScript runtime environment that executes JavaScript code outside a web browser. Node JS enables us to write server-side Javascript code. It is built on Chrome’s V8 JavaScript engine. With Node JS we can build different types of applications like web servers, command Line Applications, Rest APIs, and so on. To learn more you can go to here.
Installing node js
To create a project it should be installed on your machine and to install node js please visit here and install the node js.
Creating a Node Project
Create a new directory and initialize the node with the command.
npm init
What is NPM?
Npm is a package manager where all the javascript packages reside. We use NPM to download all the javascript packages through npm.
mkdir nodeexample
cd nodeexample/
npm init -y
After executing the command, a package.json file is generated in the project and this holds all the details relevant to the project.
Configure Express
Express is used to create a server. The below command is used to create our server.
npm install express --save
We are creating a new server that will be running on port 3000. I am creating a route that returns hello world. Here is the complete code.
const express = require('express')
const app = express()
const port = 3000
app.get('/', (req, res) => {
  res.send('Hello World!')
})
app.listen(port, () => {
  console.log(`Example app listening at http://localhost:${port}`)
})
Now start the server using the below command.
npm start
Open your browser and navigate to localhost:3000. You should see Hello world getting displayed.

Dockerize the project
What is docker?
Docker is a set of platforms as service products that use OS-level virtualization to deliver software in packages called containers. Containers are isolated from one another and bundle their own software, libraries, and configuration files.
Create an empty file named Dockerfile in the root directory and paste the following code.
# Create app directory
WORKDIR /usr/src/app

# Install app dependencies
# A wildcard is used to ensure both package.json AND package-lock.json are copied
# where available (npm@5+)
COPY package*.json ./

RUN npm install
# If you are building your code for production
# RUN npm ci --only=production

# Bundle app source
COPY . .

EXPOSE 80
CMD [ "node", "index.js" ]
Build the docker image
docker build -t <your username>/nodeexample
Run the docker image
docker run -p 49160:3000 -d <your username>/nodeexample
if successful you can go to your browser and visit this address localhost:49160/You must see Hello World. You can learn more here and this is very detailed documentation. Now what you need to do is create a Github repository and push the code to Github.
Step 2 - Set up a pipeline in Azure DevOps
Now go to Azure DevOps click on start free and log in using your email and password. After logging in click on New Project.
Provide your project name and description and choose visibility.

I am choosing Git as version control since I have my code on GitHub. After successfully creating the project you will see the below screen.

Now go to project settings.

Choose a service connection.

You may ask why are we doing this. So what we are going to do is create a docker image and push that image to the docker hub so we need to connect Azure DevOps to the docker hub. Now choose the Docker registry.
![docker.png][csharpcorner.azureedge.net/article/automate..
Provide your credentials and after that click on verify; if verified then enter the service name and click on it.

Again click on New service connection and click on Azure Resource Manager and click Next.

Choose service principal automatic.

Choose your subscription and provide your service connection name and then click on next.

Go back to Pipeline and click on Create Pipeline. Now choose Git and sign in to GitHub if needed. After signing in you will see a list of your repository and you need to choose the repository which contains your node js code. You may need to provide permission to Azure Pipeline to access your code.
Based on the code and file in the project, it will automatically suggest many options to configure our pipeline with. We are going to choose Docker in this case. Click on validate and configure.

You will be presented with an azure-pipeline.yml file to review. This file contains pretty much what we need to do but we are going to add something more to this file. we are going to add a different task to this file and for that click on Show Assistant and search for Docker and choose docker.

Step 3 - Automatically create a docker image and push it to the docker hub
Search for Docker and choose docker.

Choose your docker registry. We have already set up our service connection to docker then you must see the connection name so choose the connection and give Container repository a name. Leave everything default and click on Add. It will add another task.

# Docker
# Build a Docker image
# https://docs.microsoft.com/azure/devops/pipelines/languages/docker

trigger:
- main

resources:
- repo: self

variables:
  tag: '$(Build.BuildId)'

stages:
- stage: Build
  displayName: Build image
  jobs:
  - job: Build
    displayName: Build
    pool:
      vmImage: 'ubuntu-latest'
    steps:
    - task: Docker@2
      inputs:
        containerRegistry: 'docker connection'
        repository: 'anish78/demodckreg'
        command: 'buildAndPush'
        Dockerfile: '**/Dockerfile'
        tags: |
          $(tag)
Now click on Save and Run. Commit directly to the main branch.

You will be presented with the below screen and you will see the build running.

If you click on the build then you can see the full log of the build.

If the build is successful and if you go to Dockerhub and log in then you will see one new image being pushed to your repository.

Step 4 - Set up Terraform for automatically creating resources in Azure and deploying docker image.
So what is Terraform?
Terraform is an open-source infrastructure as a code software tool that provides a consistent CLI workflow to manage hundreds of cloud services. You can learn more here.
What is Infrastructure as Code?
Infrastructure as code (IaC) is the process of managing and provisioning resources on the Cloud rather than logging in to your cloud provider and doing it manually. You can write codes which will interact with your cloud provider and can create, modify, and delete resource automatically without visiting the portal.
Create a file named main.tf in the root directory of the project. This file holds the terraform configuration code. Add the following code.
provider "azurerm" {
    version = "2.5.0"
    features {}
}
The above code tells Terraform that we want to work with Azure because terraform is available for many providers so we need to define with which provider we want to work with.
resource "azurerm_resource_group" "anish_terraform_test" {
  name = "ans-tes-grp"
  location = "westus2"
}
As we need a resource group in azure for our resources the above code will create a resource group named ans-test-grp in west us. Let us test if everything is fine and to do so we need to initialize terraform. Use the following command for that.
terraform init

It will initialize the terraform. One of the best things about Terraform that I personally like is you can see the plan of Terraform before it creates any resource in the cloud. Let us see what is the plan of Terraform. Use the following command for that.
terraform plan
You will see the following output.

Now if you're okay with the plan you can create it. To do so use the following command.
terraform apply
Enter yes and wait for some seconds and you will see the summary and you can go to azure and check it out if it is created.

Terraform also creates a file named terraform.tfstate which contains the state of the IDs and properties of the resources Terraform created so that it can manage or destroy those resources going forward. Your state file contains all of the data in your configuration and could also contain sensitive values in plaintext, so do not share it or check it into source control. Whenever terraform performs apply it refers to the state file to check the state. So we are going to store remotely somewhere.
I am going to create a storage account in Azure and store this file there. You can learn more here.
Let us add this piece of code to the main.tf
terraform {
    backend "azurerm" {
        resource_group_name  = "anishRG" // resouce group name
        storage_account_name = "terraformstfl" // storage account name
        container_name       = "tfstate" // container name
        key                  = "terraform.tfstate" // file name
    }
}
Now terraform will go to a resource group named anishRG and it will look for the storage account name "terraformstfl". Then it will store the file in a tfstate container. Whenever we push the changes to Github it will run our pipeline and create a docker image and we need to keep track of the tag of the image, so for that let us add a variable.
variable "imagebuild" {
  type        = string
  description = "Latest Image Build"
}
Now let us create a container instance in Azure that will run our docker container in Azure.
resource "azurerm_container_group" "tfcg_test" {
  name                      = "node-taste-anish1"
  location                  = azurerm_resource_group.anish_terraform_test.location
  resource_group_name       = azurerm_resource_group.anish_terraform_test.name

  ip_address_type     = "public"
  dns_name_label      = "anish78"
  os_type             = "Linux"

  container {
      name            = "node-tes-anish"
      image           = "anish78/nodetest:${var.imagebuild}"
        cpu             = "1"
        memory          = "1"

        ports {
            port        = 80
            protocol    = "TCP"
        }
  }
}
So my final main.tf looks like this.
provider "azurerm" {
    version = "2.5.0"
    features {}
}

terraform {
    backend "azurerm" {
        resource_group_name  = "anishRG"
        storage_account_name = "terraformstfl"
        container_name       = "tfstate"
        key                  = "terraform.tfstate"
    }
}

variable "imagebuild" {
  type        = string
  description = "Latest Image Build"
}

resource "azurerm_resource_group" "anish_terraform_test" {
  name = "ans-tes-grp"
  location = "Australia East"
}

resource "azurerm_container_group" "tfcg_test" {
  name                      = "node-taste-anish"
  location                  = azurerm_resource_group.anish_terraform_test.location
  resource_group_name       = azurerm_resource_group.anish_terraform_test.name

  ip_address_type     = "public"
  dns_name_label      = "anish78"
  os_type             = "Linux"

  container {
      name            = "node-tes-anish"
      image           = "anish78/nodetest:${var.imagebuild}"
        cpu             = "1"
        memory          = "1"

        ports {
            port        = 80
            protocol    = "TCP"
        }
  }
}
We need to provide access to terraform in order to work remotely -- I mean from pipeline not from our local machine -- and to do so head over to Azure and search for Azure Active directory. Click on App registration and click on new registration.

Give it a name and choose Accounts in this organizational directory only (Default Directory only - Single-tenant). Click on the register and once it is complete copy the following. Client ID Tenant ID Head over to certificates and secrets and click on New client secret. Give it a name and copy the value.

Now go back to your subscription and copy the subscription ID. Go to your pipeline and click on Library for adding these four values for terraform to communicate with Azure. Add all four values here like below.

Once you're done go to your azure-pipeline.yml file and add another stage.
- stage: Provision
  displayName: 'Terraforming on Azure...'
  dependsOn: Build
  jobs:
  - job: Provision
    displayName: 'Provisioning Container Instance'
    pool:
      vmImage: 'ubuntu-latest'
    variables:
    - group: terraformvars // Library name in your pipeline
    steps:
    - script: |
        set -e
        terraform init -input=false
        terraform apply -input=false -auto-approve
      name: 'RunTerraform'
      displayName: 'Run Terraform'
      env:
        ARM_CLIENT_ID: $(ARM_CLIENT_ID)
        ARM_CLIENT_SECRET: $(ARM_CLIENT_SECRET)
        ARM_TENANT_ID: $(ARM_TENANT_ID)
        ARM_SUBSCRIPTION_ID: $(ARM_SUBSCRIPTION_ID)
        TF_VAR_imagebuild: $(tag)
Now we are ready to test the workflow. Now go to the code and make any changes and push it to GitHub. Once done head back to DevOps. Now go to the code and make any changes and push it to GitHub. Head back to DevOps and you will see one build running with two states something like below and of course you can see the complete log when you click on it. Once it is done you can go back to azure and check if everything is completed.

So now you don't need to build your docker image and push it to the docker hub. You don't need to create resources manually. You just need to focus on your code and whenever you push any changes it will do the rest for you. Now if everything is complete you can go to Azure and check if the Azure container instance is running.


You can check out the complete project here.
I hope this is helpful. Feedback and suggestions are welcome and if you need any help feel free to contact me. Thanks for reading.
