


Hello everyone, In this article, we are going to build a fully function tiny web app which will be able to store messages in the queue using RabbitMQ and it will send an SMS to user on their phone using Twilio. We will be using the Twilio SDK and Laravel.
So, let us start,
Before start building, let us discuss our workflow and let us plan what we are going to do and how. Excuse my design but this is what we are going to build.
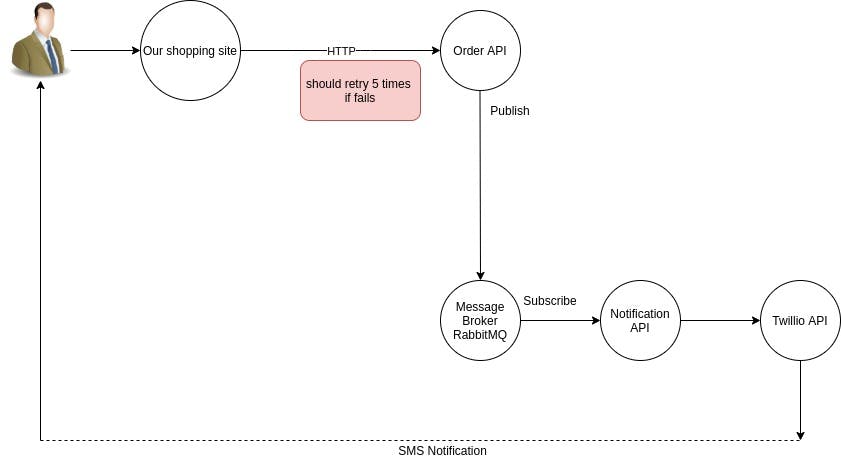
The user will click on the order button on our website and then order API will be called and let's assume there is any issue then It will retry 5 times to place the order. once the order is placed then details of the order will be published to the message broker which is RabbitMQ. Then notification API will read the message from the queue and it will call Twillio API which in turn sends the message to the user's phone.
So let us install RabbitMQ first for storing messages and then we will write our order API. Follow the steps to install RabbitMQ
Let’s begin with updating:
sudo apt-get update
sudo apt-get -y upgrade
Enable the RabbitMQ application repository:
sudo echo "deb http://www.rabbitmq.com/debian/ testing main" >> /etc/apt/sources.list
Add the verification key for the package:
curl http://www.rabbitmq.com/rabbitmq-signing-key-public.asc | sudo apt-key add -
Update the sources with our new addition from above:
sudo apt-get update
Download and install RabbitMQ:
sudo apt-get install rabbitmq-server
To enable RabbitMQ Management Console, run the following:
sudo rabbitmq-plugins enable rabbitmq_management
Once you’ve enabled the console, it can be accessed using your browser by visiting: http://[your droplet's IP]:15672/.
for me, it is localhost so localhost:15672 and if everything is good then you must see a login screen like below.
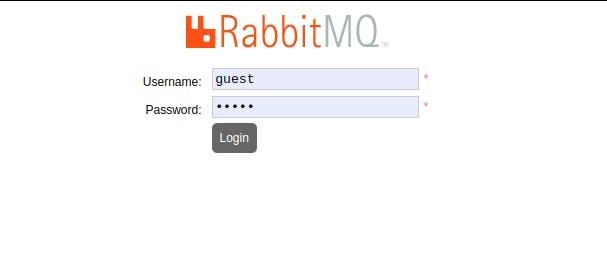
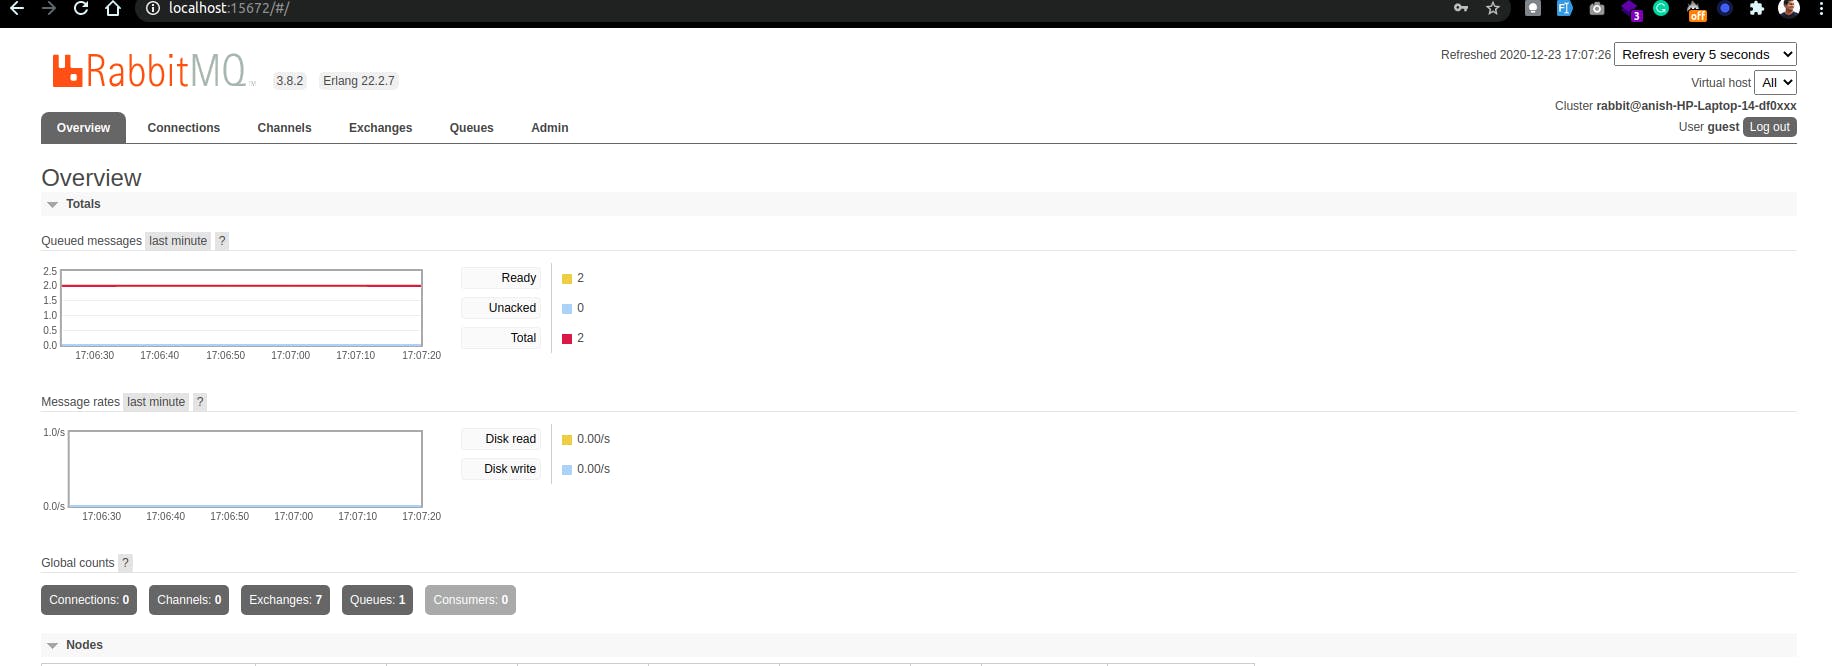
The default username and password are both set “guest” for the login. After successful login, you must see this screen.
Now let us begin with our order API.
create a Laravel project using this command. You can learn more here
composer create-project --prefer-dist laravel/laravel:^7.0 order
if you don't have composer you can install it from here .
after successful installation cd in that folder.
cd order
After successful installation, now we are going to add a package that is an AMQP wrapper for Larave to publish and consume messages especially from RabbitMQ. You can find more description here
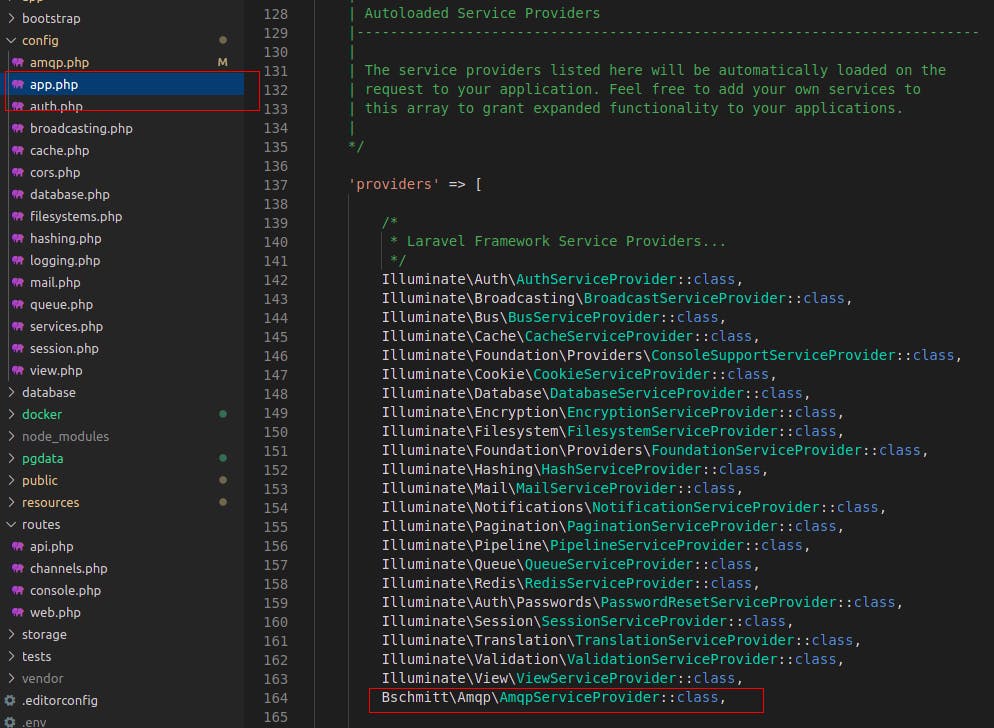
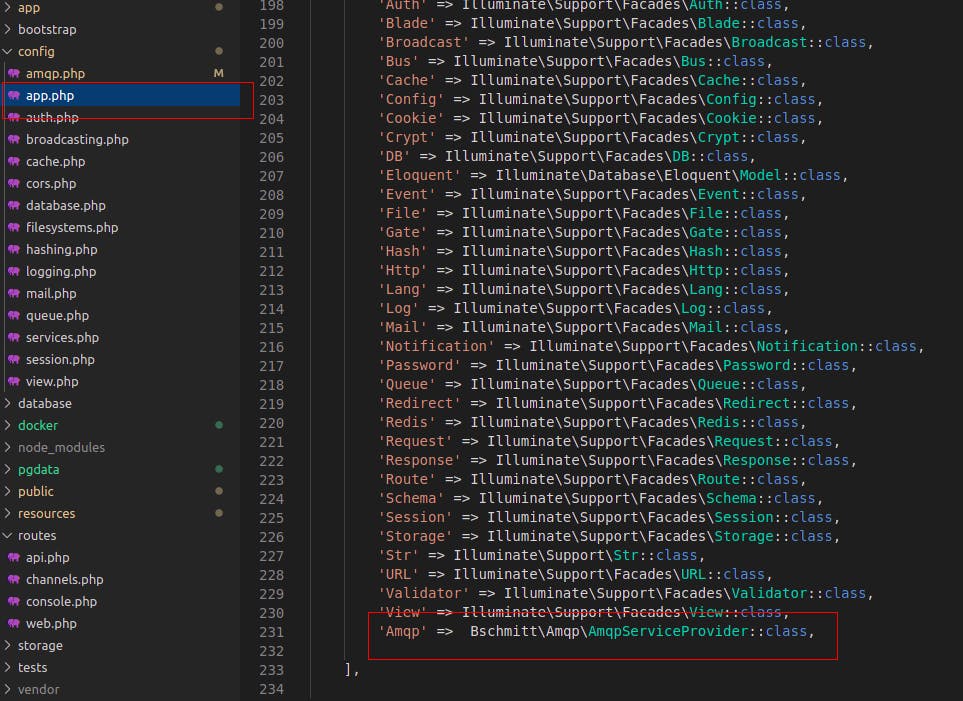
Open config/app.php and add the service provider and alias:
'Bschmitt\Amqp\AmqpServiceProvider',
'Amqp' => 'Bschmitt\Amqp\Facades\Amqp',
Like below add provider
Add Alias
Now to go to the config folder and open the amqp.php file and configure RabbitMQ as follows
       'host'              => env('AMQP_HOST', 'localhost'),
       'port'              => env('AMQP_PORT', 5672),
       'username'     => env('AMQP_USER', 'guest'),
       'password'     => env('AMQP_PASSWORD', 'guest'),
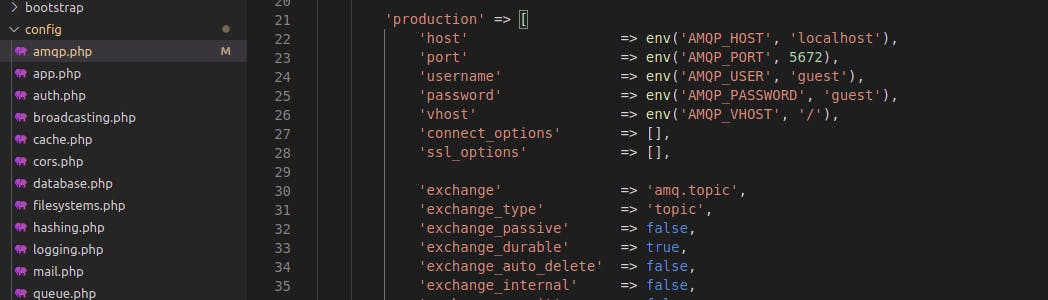
Where the host is the localhost in our case the port is 5672 which is the main port for RabbitMQ communication and 15672 is for the management console username is guest and the password is guest.
Now issue the following command or go to your localhost/order/public
php artisan serve
Now visit the URL generated by the command and you will see the default welcome page.
Now let us create a controller named orderController using the following command
php artisan make:controller orderController
Now open your Ordercontroller and lets code
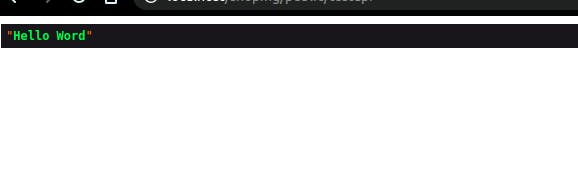
let's create a function named index and dump 'Hello World' just for testing if everything is working
public function index()
{

 dd('Hello Word');

}
let's add a route and test our function and for this go-to routes folder and open web.php

Add the following code
<?php

use Illuminate\Support\Facades\Route;

Route::get('/testapi', 'orderController@index')->name('testapi');
Go to this localhost/order/public/testapi and you will see Hello world
 Perfect, Now let's do some real coding. Now add the following code to your function.
try {

            $min = 1;
            $max = 10000;
            $order = rand($min, $max);
            $message = "Thank you for using ecommerce your order number is:"$order;
            Amqp::publish('routing-key', $message, ['queue' => 'test']);
} catch (Exception $exception) {
            dd($exception);
        }
So what I am doing here is a very simple task, I am creating a random number which is order id, and a message string and pushing this message with the order id to queue.
Amqp::publish('routing-key', $message, ['queue' => 'test']);
So this code here creates a queue named to test and pushes a message to the queue.
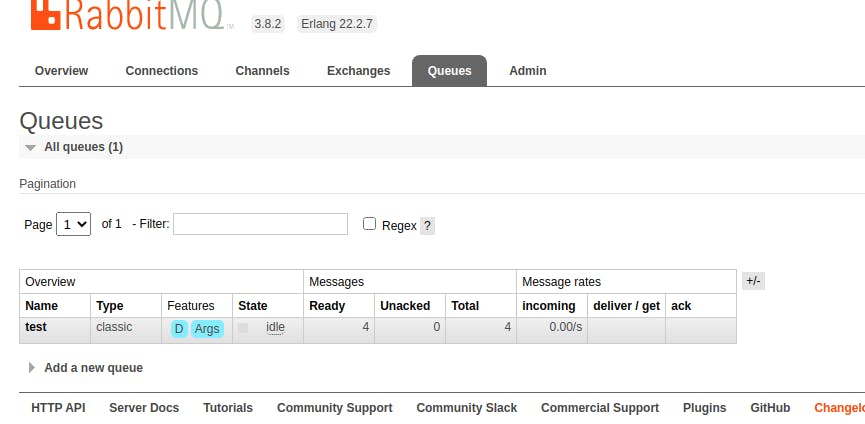
Let us test if everything is fine, go to the browser and refresh the page, and log in to RabbitMQ management and navigate to the Queue tab to check if there is any message.
You must see a queue named to test and one message well I am seeing four because I have sent four messages to the queue.
Greate so we have pushed a message to the queue. Now let us consume that message and send this message to the user mobile no and before doing that we need to install Twilio SDK for PHP. use this command to or you can follow documentation for installation.
composer require twilio/sdk
once this installation is complete, let us create another function called notification and add a route to web.php
Route::get('/notification',[OrderController::class, 'notification'])->name('notification');
public function notiication()
    {
        try {

            Amqp::consume('test', function ($message, $resolver) {

                $sid = 'ACf3ba81136a16388fc91a87e921d0254b';
                $token = '822b5d4253b6f4f604caaded8cd7a7e7';
                $client = new Client($sid, $token);

                // Use the client to do fun stuff like send text messages!
                $client->messages->create(
                    // the number you'd like to send the message to
                    '+9771234567890,
                    [
                        // A Twilio phone number you purchased at twilio.com/console
                        'from' => '+1234567890',
                        // the body of the text message you'd like to send
                        'body' => $message->body,
                    ]
                );

                $resolver->acknowledge($message);

                $resolver->stopWhenProcessed();
            });
            $data = [
                'status'=>'success',
            ];

            return response($data,200);

        } catch (\Exception $exception) {
            dd($exception);

            return response('error', 500);
        }
    }
so this is the code where we are going to read the message from the queue named test which we have created above.$sid,$token you will get it from Twillio dashboard and the rest is self-explanatory I think. Now we are going to call this function right after the message is pushed to the queue. if you want to decouple both the operations then definitely you can but since this is just for demonstration purpose I am using at one place.
So our backend code looks something like this
public function index()
    {
        try {

            $min = 1;
            $max = 10000;
            $order = rand($min, $max);
            $message = "Thank you for using ecommerce your order number is:" . $order;
            Amqp::publish('routing-key', $message, ['queue' => 'test']);
            $this->notification();

        } catch (Exception $exception) {
            dd($exception);
        }
    }


public function notiication()
    {
        try {

            Amqp::consume('test', function ($message, $resolver) {

                $sid = 'ACf3ba81136a16388fc91a87e921d0254b';
                $token = '822b5d4253b6f4f604caaded8cd7a7e7';
                $client = new Client($sid, $token);

                // Use the client to do fun stuff like send text messages!
                $client->messages->create(
                    // the number you'd like to send the message to
                    '+9779807214786',
                    [
                        // A Twilio phone number you purchased at twilio.com/console
                        'from' => '+16202368003',
                        // the body of the text message you'd like to send
                        'body' => $message->body,
                    ]
                );

                $resolver->acknowledge($message);

                $resolver->stopWhenProcessed();
            });
            $data = [
                'status'=>'success',
            ];
            return response($data,200);

        } catch (\Exception $exception) {
            dd($exception);

            return response('error', 500);
        }
    }
We are pretty much done with the Backend and now let's move to our fronted and for this, I am going to create a simple HTML file and include jquery and bootstrap for design and Ajax call to our API. so I am creating index.html and adding a button to test our work and nothing fancy, and yes let us add our retry code if you refer to the diagram above there is retry pattern included. so this is the code I have written for retry.
<script>
$(document).on('click', '#button', function () {

    retry(retryCount=5);

});
        function retry( retryCount)
        {
            var successCount = 0;
            var errorCount = 0;
            // var retryCount = 5;
            $.ajax({
               url: 'http://localhost/shoping/public/testapi',
                method: 'get',
                success: function (data) {
                    return false;
                },
                error: function (err) {
                    if (retryCount > 0) {
                        setTimeout(function () {
                            return retry(retryCount - 1);
                        }, 500);

                    }
                },
            });
            console.log('Retry :'+ retryCount);
            // console.log('Success Ateempt:'+ successCount);

        }

</script>
And this is the final HTML code.
<!DOCTYPE html>
<html>
<head>
        <meta charset="utf-8">
        <meta name="viewport" content="width=device-width, initial-scale=1">
        <title>Laravel</title>
        <!-- Fonts -->
        <link href="https://fonts.googleapis.com/css?family=Nunito:200,600" rel="stylesheet">
        <link rel="stylesheet" href="https://maxcdn.bootstrapcdn.com/bootstrap/4.0.0/css/bootstrap.min.css" integrity="sha384Gn5384xqQ1aoWXA+058RXPxPg6fy4IWvTNhE263XmFcJlSAwiGgFAW/dAiS6JXm" crossorigin="anonymous">
        <script src="https://code.jquery.com/jquery3.2.1.slim.min.js" integrity="sha384KJ3o2DKtIkvYIK3UENzmM7KCkRr/rE9/Qpg6aAZGJwFDMVNA/GpGFF93hXpG5KkN" crossorigin="anonymous"></script>
        <script src="https://cdnjs.cloudflare.com/ajax/libs/popper.js/1.12.9/umd/popper.min.js" integrity="sha384ApNbgh9B+Y1QKtv3Rn7W3mgPxhU9K/ScQsAP7hUibX39j7fakFPskvXusvfa0b4Q" crossorigin="anonymous"></script>
        <script src="https://maxcdn.bootstrapcdn.com/bootstrap/4.0.0/js/bootstrap.min.js" integrity="sha384JZR6Spejh4U02d8jOt6vLEHfe/JQGiRRSQQxSfFWpi1MquVdAyjUar5+76PVCmYl" crossorigin="anonymous"></script>
        <script src="https://code.jquery.com/jquery-2.2.4.js" integrity="sha256-iT6Q9iMJYuQiMWNd9lDyBUStIq/8PuOW33aOqmvFpqI=" crossorigin="anonymous"></script>
        <!-- Styles -->
    </head>
    <body>
<button name="button" id="button" value=' CLick me'>Click me</button>
<script>
$(document).on('click', '#button', function () {

    retry(retryCount=5);

});
        function retry( retryCount)
        {
            var successCount = 0;
            var errorCount = 0;
            // var retryCount = 5;
            $.ajax({
                url: 'http://localhost/shoping/public/testapi',
                method: 'get',
                success: function (data) {
                    return false;
                },
                error: function (err) {
                    if (retryCount > 0) {
                        setTimeout(function () {
                            return retry(retryCount - 1);
                        }, 500);

                    }
                },
            });
            console.log('Retry :'+ retryCount);
            // console.log('Success Ateempt:'+ successCount);

        }

</script>
</html>
Now let us test our work, open your HTML file in the browser and you will see a button.
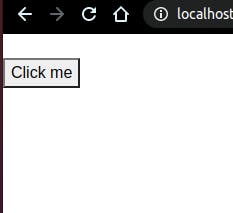
Now click on that button and it will try to push the message and consume the message and sends the message to the provided mobile number which must be verified to Twillio in order to receive the message. So this is the final output we should get.

Thank you for reading. Suggestion and feedbacks are welcome and next, we are going to dockerize this application and run in an isolated container. Thank you and stay safe.
